Certified
The Volante connector is used to integrate financial applications using standard message formats (SWIFT, FIX, NACHA, etc.) running on a Mule Runtime platform. The Volante Connector enables businesses to build and integrate Mule Applications with Volante Message Flows.
Prerequisites
This document assumes that you are familiar with Volante Flows, Mule, Anypoint Connectors, Anypoint Studio, Mule flows, and Mule Global Elements. To use this connector you need the following:
-
Volante Runtime Dependencies for executing the flow
What’s New in this Connector
-
Support for Mule 4.9.1.
-
Support for volante runtime 7.x (7.1.0 and later)
To Install Volante Connector in Anypoint Studio 7.21
Use one of the following ways to install volante connector in Anypoint studio
Add from Mule Palette
-
In Anypoint Studio 7.21, click Add Module and specify the name of the connector.
-
Click Add to add the connector to your project.
Add as dependency
-
Specify volante connector as a dependency in the pom.xml file
<dependency>
  <groupId>com.volantetech.volante</groupId>
  <artifactId>mule4-volante-connector</artifactId>
  <version>3.0.0</version>
  <classifier>mule-plugin</classifier>
</dependency>
Configure in Studio
-
Drag and drop the volante connector from mule palette to the Mule flow editor
-
Configure the Global element for volante connector.

-
Add Volante Runtime dependencies in pom.xml as dependency and as a shared library.
To Configure Example Dependencies
To execute examples, add dependencies in pom.xml as shown below
  1
2
3
4
5
6
7
8
9
10
11
12
13
14
15
16
17
18
19
20
21
22
23
24
25

  <dependency>
        <groupId>com.volantetech.volante.cartridge</groupId>
        <artifactId>cartridge-OrderTest</artifactId>
        <version>1.0</version>
</dependency>
<dependency>
        <groupId>com.volantetech.volante</groupId>
        <artifactId>volante-ascii-delimited</artifactId>
        <version>7.1.0</version>
</dependency>
<dependency>
        <groupId>com.volantetech.volante</groupId>
        <artifactId>volante-core</artifactId>
        <version>7.1.0</version>
</dependency>
<dependency>
        <groupId>com.volantetech.volante</groupId>
        <artifactId>volante-utils</artifactId>
        <version>7.1.0</version>
</dependency>
<dependency>
        <groupId>com.volantetech.volante</groupId>
        <artifactId>volante-simple</artifactId>
        <version>7.1.0</version>
</dependency>
Add the artifactId and groupId of the above mentioned dependencies in the sharedLibraries as shown below
  1
2
3
4
5
6
7
8
9
10
11
12
13
14
15
16
17
18
19
20
21
22
23
24
25
26
27
28
29
30
31
32
33
34

  <build>
    <plugins>
        <plugin>
            <groupId>org.mule.tools.maven</groupId>
            <artifactId>mule-maven-plugin</artifactId>
            <version>${mule.maven.plugin.version}</version>
            <extensions>true</extensions>
            <configuration>
                <sharedLibraries>
                    <sharedLibrary>
                        <groupId>com.volantetech.volante.cartridge</groupId>
                        <artifactId>cartridge-OrderTest</artifactId>
                    </sharedLibrary>
                    <sharedLibrary>
                        <groupId>com.volantetech.volante</groupId>
                        <artifactId>volante-ascii-delimited</artifactId>
                    </sharedLibrary>
                    <sharedLibrary>
                        <groupId>com.volantetech.volante</groupId>
                        <artifactId>volante-core</artifactId>
                    </sharedLibrary>
                    <sharedLibrary>
                        <groupId>com.volantetech.volante</groupId>
                        <artifactId>volante-utils</artifactId>
                    </sharedLibrary>
                    <sharedLibrary>
                        <groupId>com.volantetech.volante</groupId>
                        <artifactId>volante-simple</artifactId>
                    </sharedLibrary>
                </sharedLibraries>
            </configuration>
        </plugin>
    </plugins>
</build>
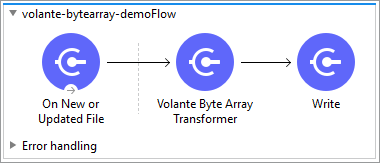
Use Case: Volante Byte Array Transformer
Volante Byte Array Transformer can be used to accept, transform and output byte array values. The expected payload type of input and output is Binary.
-
Create a new Mule Application and drag and drop On New or Updated File operation from mule palette and configure the input path.
-
Drag and drop the Volante Byte Array Transformer to the flow.
-
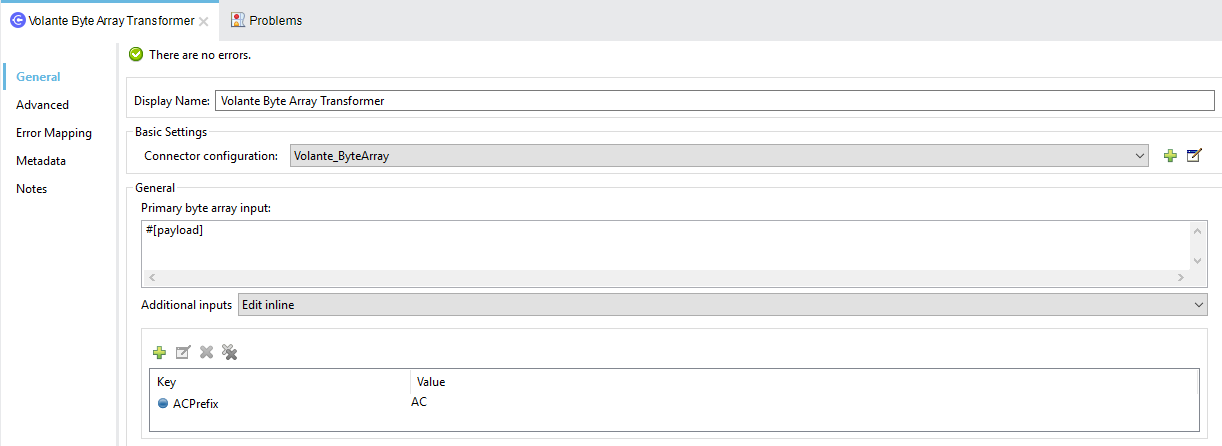
Create a new configuration for the Volante Byte Array Transformer and specify the Message Flow and TransformContext with the following values:
Parameter Value MessageFlow
OrderFlowBinary
TransformContext
None
-
Click the Save button.
-
Assign newly created Global configuration to the Volante Byte Array Transformer.
-
Configure the primary input and additional inputs in the Volante Byte Array Transformer.
-
Drag and drop the Write File operation and configure the output file path.
-
Save and run the project as a Mule Application.
-
To test the app, copy the sample to the input directory configured in step 1.
XML flow:
  1
2
3
4
5
6
7
8
9
10
11
12
13
14
15
16
17
18
19
20
21
22
23
24

  <?xml version="1.0" encoding="UTF-8"?>

<mule xmlns:volante="http://www.mulesoft.org/schema/mule/volante" xmlns:file="http://www.mulesoft.org/schema/mule/file"
        xmlns="http://www.mulesoft.org/schema/mule/core"
        xmlns:doc="http://www.mulesoft.org/schema/mule/documentation" xmlns:xsi="http://www.w3.org/2001/XMLSchema-instance" xsi:schemaLocation="http://www.mulesoft.org/schema/mule/core http://www.mulesoft.org/schema/mule/core/current/mule.xsd
http://www.mulesoft.org/schema/mule/file http://www.mulesoft.org/schema/mule/file/current/mule-file.xsd
http://www.mulesoft.org/schema/mule/volante http://www.mulesoft.org/schema/mule/volante/current/mule-volante.xsd">
    <volante:config name="Volante_ByteArray" doc:name="Volante Mule Project with Maven">
                <volante:maven-connection messageFlow="OrderFlowBinary" />
        </volante:config>
    <flow name="volante-bytearray-demoFlow">
        <file:listener doc:name="On New or Updated File" directory="Input" recursive="false" autoDelete="true">
            <scheduling-strategy >
                <fixed-frequency />
            </scheduling-strategy>
        </file:listener>
        <volante:transform-byte-array doc:name="Volante Byte Array Transformer" config-ref="Volante_ByteArray">
            <volante:additional-inputs >
                <volante:additional-input key="ACPrefix" value="AC" />
            </volante:additional-inputs>
        </volante:transform-byte-array>
        <file:write doc:name="Write" path="Output/output.xml"/>
    </flow>
</mule>
Use Case: Volante String Transformer
Volante String Transformer can be used to accept, transform and output string values. The expected payload type of input and output is String.

-
Create a new Mule Application and drag and drop On New or Updated File operation from mule palette and configure the input path.
-
Drag and drop the Volante String Transformer to the flow.
-
Create a new configuration for the Volante String Transformer and specify the Message Flow and TransformContext with the following values:
Parameter Value MessageFlow
OrderFlowString
TransformContext
None
-
Click the Save button.
-
Assign newly created Global configuration to the Volante String Transformer.
-
Configure the primary input and additional inputs in the Volante String Transformer.

-
Drag and drop the Write File operation and configure the output file path.
-
Save and run the project as a Mule Application.
-
To test the app, copy the sample to the input directory configured in step 1.
XML flow:
  1
2
3
4
5
6
7
8
9
10
11
12
13
14
15
16
17
18
19
20
21

  <?xml version="1.0" encoding="UTF-8"?>

<mule xmlns:ee="http://www.mulesoft.org/schema/mule/ee/core" xmlns:volante="http://www.mulesoft.org/schema/mule/volante"
        xmlns:file="http://www.mulesoft.org/schema/mule/file"
        xmlns="http://www.mulesoft.org/schema/mule/core" xmlns:doc="http://www.mulesoft.org/schema/mule/documentation" xmlns:xsi="http://www.w3.org/2001/XMLSchema-instance" xsi:schemaLocation="http://www.mulesoft.org/schema/mule/core http://www.mulesoft.org/schema/mule/core/current/mule.xsd
http://www.mulesoft.org/schema/mule/file http://www.mulesoft.org/schema/mule/file/current/mule-file.xsd
http://www.mulesoft.org/schema/mule/volante http://www.mulesoft.org/schema/mule/volante/current/mule-volante.xsd
http://www.mulesoft.org/schema/mule/ee/core http://www.mulesoft.org/schema/mule/ee/core/current/mule-ee.xsd">
    <volante:config name="Volante_String" doc:name="Volante Mule Project with Maven" doc:id="a3222fd0-e4a5-4d47-935a-1449b5b91426" >
                <volante:maven-connection messageFlow="OrderFlowString" />
        </volante:config>
        <flow name="volante-string-demoFlow">
                <file:listener doc:name="On New or Updated File" directory="Input" recursive="false" autoDelete="true">
                        <scheduling-strategy >
                                <fixed-frequency />
                        </scheduling-strategy>
                </file:listener>
                <volante:transform-string doc:name="Volante String Transformer" config-ref="Volante_String"/>
                <file:write doc:name="Write" path="Output/output.xml"/>
        </flow>
</mule>
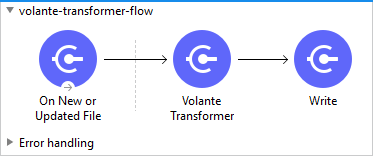
Use Case: Volante Transformer
Volante Transformer can be used to accept, transform and output object values. The expected payload type of input and output is Object.
-
Create a new Mule Application and drag and drop On New or Updated File operation from mule palette and configure the input path.
-
Drag and drop the Volante Transformer to the flow.
-
Create a new configuration for the Volante Transformer and specify the Message Flow and TransformContext with the following values:
Parameter Value MessageFlow
OrderFlowRawMessage
TransformContext
None
-
Click the Save button.
-
Assign newly created Global configuration to the Volante Transformer.
-
Configure the primary input and additional inputs in the Volante Transformer.

-
Drag and drop the Write File operation and configure the output file path.
-
Save and run the project as a Mule Application.
-
To test the app, copy the sample to the input directory configured in step 1.
XML flow:
  1
2
3
4
5
6
7
8
9
10
11
12
13
14
15
16
17
18
19
20
21

  <?xml version="1.0" encoding="UTF-8"?>

<mule xmlns:file="http://www.mulesoft.org/schema/mule/file" xmlns:volante="http://www.mulesoft.org/schema/mule/volante"
        xmlns="http://www.mulesoft.org/schema/mule/core"
        xmlns:doc="http://www.mulesoft.org/schema/mule/documentation" xmlns:xsi="http://www.w3.org/2001/XMLSchema-instance" xsi:schemaLocation="http://www.mulesoft.org/schema/mule/core http://www.mulesoft.org/schema/mule/core/current/mule.xsd
http://www.mulesoft.org/schema/mule/volante http://www.mulesoft.org/schema/mule/volante/current/mule-volante.xsd
http://www.mulesoft.org/schema/mule/file http://www.mulesoft.org/schema/mule/file/current/mule-file.xsd">
        <volante:config name="Volante_Transformer" doc:name="Volante Mule Project with Maven">
                <volante:maven-connection messageFlow="OrderFlowRawMessage" />
        </volante:config>
        <flow name="volante-transformer-flow">
                <file:listener doc:name="On New or Updated File" directory="Input" recursive="false" autoDelete="true">
                        <scheduling-strategy >
                                <fixed-frequency />
                        </scheduling-strategy>
                </file:listener>
                <volante:transform-object doc:name="Volante Transformer" config-ref="Volante_Transformer"/>
                <file:write doc:name="Write" path="Output/output.xml"/>
        </flow>
</mule>
Use Case: Volante POJO Transformer
Volante POJO Transformer can be used to accept, transform and output object values. Volante POJO Transformer will accept and process serialized object. Exception will be thrown if payload type is String.

-
Create a new Mule Application and drag and drop On New or Updated File operation from mule palette and configure the input path.
-
Drag and drop the Volante POJO Transformer to the flow.
-
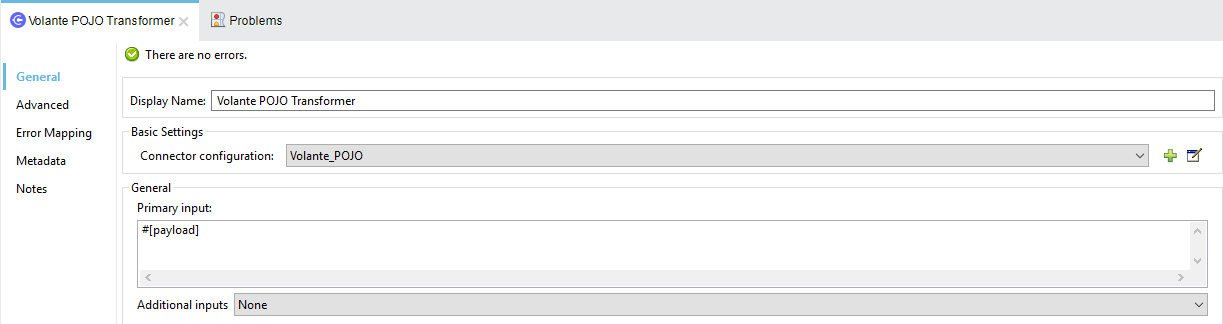
Create a new configuration for the Volante POJO Transformer and specify the Message Flow and TransformContext with the following values:
Parameter Value MessageFlow
OrderFlowPOJO
TransformContext
None
-
Click the Save button.
-
Assign newly created Global configuration to the Volante POJO Transformer.
-
Configure the primary input and additional inputs in the Volante POJO Transformer.
-
Drag and drop the Write File operation and configure the output file path.
-
Save and run the project as a Mule Application.
-
To test the app, copy the sample to the input directory configured in step 1.
XML flow:
  1
2
3
4
5
6
7
8
9
10
11
12
13
14
15
16
17
18
19
20

  <?xml version="1.0" encoding="UTF-8"?>

<mule xmlns:volante="http://www.mulesoft.org/schema/mule/volante" xmlns:file="http://www.mulesoft.org/schema/mule/file"
        xmlns="http://www.mulesoft.org/schema/mule/core"
        xmlns:doc="http://www.mulesoft.org/schema/mule/documentation" xmlns:xsi="http://www.w3.org/2001/XMLSchema-instance" xsi:schemaLocation="http://www.mulesoft.org/schema/mule/core http://www.mulesoft.org/schema/mule/core/current/mule.xsd
http://www.mulesoft.org/schema/mule/file http://www.mulesoft.org/schema/mule/file/current/mule-file.xsd
http://www.mulesoft.org/schema/mule/volante http://www.mulesoft.org/schema/mule/volante/current/mule-volante.xsd">
    <volante:config name="Volante_POJO" doc:name="Volante Mule Project with Maven">
                <volante:maven-connection messageFlow="OrderFlowPOJO" />
        </volante:config>
        <flow name="volante-pojo-demoFlow">
                <file:listener doc:name="On New or Updated File" directory="Input" recursive="false" autoDelete="true">
                        <scheduling-strategy >
                                <fixed-frequency />
                        </scheduling-strategy>
                </file:listener>
                <volante:transform-pojo doc:name="Volante POJO Transformer" config-ref="Volante_POJO"/>
                <file:write doc:name="Write" path="Output/output.xml"/>
        </flow>
</mule>